I am excited about this month's theme because; 1) I love making things, 2) I love the holidays and 3) I had a perfect idea for a dual-purpose project.
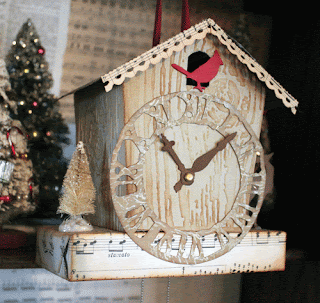
My sister and I exchange handmade ornaments every year. This year our theme was "Something Made of Paper". So combining the themes I created a "Tim Holtz Cuckoo Clock" ornament.
I began by covering a small box with old sheet music. This happened to be from The Nutcracker Suite in case anyone happens to notice. Before I sealed up the box I punched two small holes in the bottom of the box and ran a small chain through it leaving both ends hanging out of the bottom. I sealed up the box and used Distress inks to age the paper edges.
Using all Sizzix dies, I die cut two Tattered Pinecone pieces and followed Tim Holtz's video to create the pinecones hanging beneath the clock. I added some snowy glitter using white glue.
I cut out a House, 3-D and used the Woodgrain Texture Fade for added dimension to the sides. Again, using Distress inks I highlighted the raised texture. I cut an opening near the top arch and attached a small die cut Cardinal {more festive than a Cuckoo Bird}.
I die cut the Weathered Clock and first applied Tea Dye Distress ink as a background color. Next, I used Perfect Medium with an all-over pattern stamp and applied Perfect Pearls in Heirloom Gold. This created a random, worn metallic look to the clock face. Before assembling the clock/house I laid the clock face on the front and determined where the clock hands would be attached. I used a small brad to attach the hands then removed the clock face while I worked on the next steps.
I assembled the clock/house and decided that it needed a roof. I folded a piece of brown cardstock and ran both sides through my Vagabond die cutting machine using the Snowflurries Texture Fade. I sanded the raised surface to give it more texture. I also added a small piece of die cut Vintage Lace along the front edge of the roof. It is cut from more old sheet music and left over from a previous project. It gave the house a gingerbread roof line. I used a large needle to punch two holes in the roof and top of the house. I glued the roof to the house then strung a piece of vintage ribbon through the holes.
I used hot glue to attach the house to the bottom box. I glued the clock face to both the house and the base. On the left side of the clock I added a small bottlebrush tree. On the right, I glued a small die cut Reindeer.I hope you enjoyed my Handmade for the Holidays project. Please use the DCC Blog Hop button on the right to visit all of the talented designers and see their creative projects.
This is linked to:
Beyond the Picket Fence, Coastal Charm, Elizabeth and Co., Making the World Cuter, My Uncommon Slice of Suburbia, Savvy Southern Style, Sew Can Do, Sew Much Ado, Someday Crafts, Sugar Bee Crafts, The Shabby Creek Cottage, The Thrifty Home, The Trendy Treehouse, Topsy Turvy and Twin Dragonfly Designs


Wow! Is your sister one lucky girl! It doesn't even look like it is made out of paper. Absolutely beautiful!
ReplyDeleteI absolutely love it! The clock turned out so well. Come over and say hi I have a Christmas card tutorial.
ReplyDeleteGorgeous clock!
ReplyDeleteT'onna
Submarine Sunday Link Party
This is a clever assemblage and turned out REALLY well. She will love it.
ReplyDelete